QuickBooks Online Payroll now allows you to set up an effective date for payroll types. This means you can limit the use of these payroll types to specific dates or date ranges. It also means that you can effectively terminate a payroll item you've been using to pay an employee by setting an ending date for that payroll item.
Setting an Effective Date of a Pay Type
You can set effective dates for new Pay Types or for existing Pay Types. So why might you want Effective Dates for Pay Types (aka: payroll items)?
- To configure a one-time addition to an employee's Payroll and not be required to remove it after it's used. The "Unassign on" date essentially turns off the item.
- To configure a limited-time deduction to an employee's Payroll, and not be required to remove it after the limited-time period is completed. Once again, the "Unassign on" date prevents future deductions from being made.
- To track the time frame (starting date and ending date) for payroll items that frequently change on an Employee's paycheck.
Now, let's look at how to set up for new Pay Types and existing Pay Types with Effective Dates.
Setting Effective Dates for New Pay Types:
1) Go to Payroll, then Employees.
2) Select an Employee for whom you wish to add a New Pay Type.
3) From Additional Pay Types, select Add.
4) Select an existing Pay Type from the Pay types ˅ dropdown, or choose + New Pay Type if you wish to create an entirely new Pay Type.
5) Fill out the fields like Name, Rate, or Recurring Amount, if applicable.
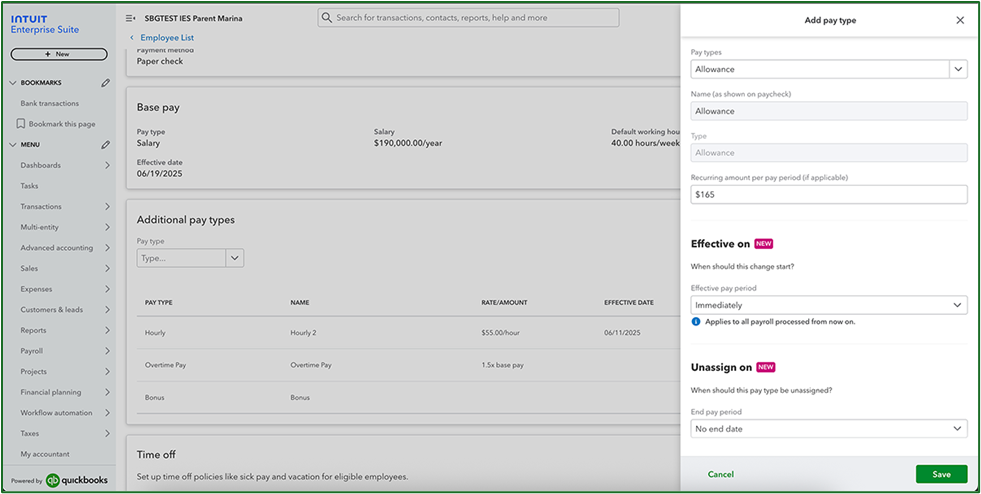
7) Choose Save to complete the set-up of the new Pay Type.
Setting Effective Dates on an Employee's Existing Pay Type(s):
1) Go to Payroll, then Employees.2) Select the Employee for whom you wish to set an Effective Date for a Pay Type.
3) Choose the Base Pay or Additional Pay Type you wish to assign an Effective Date.
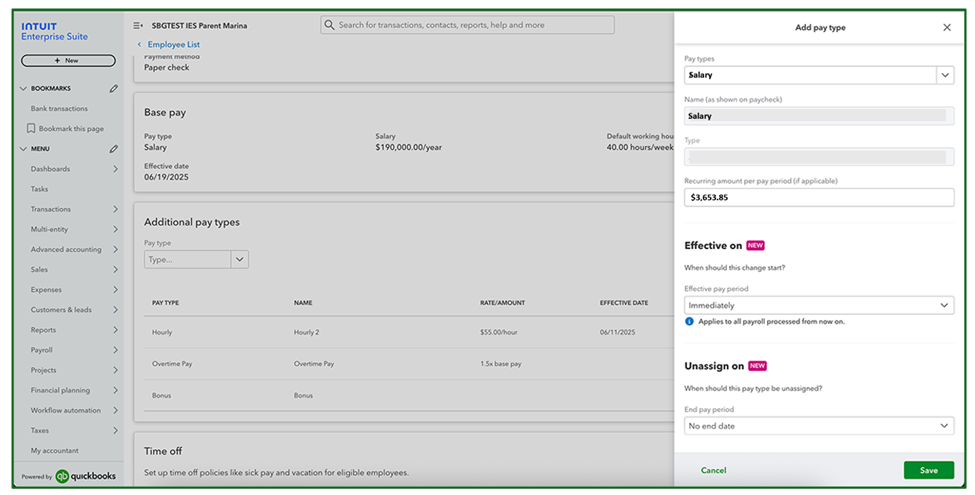
4) Update the Amount or Recurring Rate, if applicable.
5) Select an Effective on date.
6) If appropriate, select an Unassign on date, or choose No end date.
7) Click Save to finalize the changes to this Employee's Payroll.
In either case, you have set Effective Dates or Ending Dates for the specific Payroll Types and the specific Employee.
Note: While graphics reflected herein were taken from QBO Payroll running as part of Intuit Enterprise Suite, the instructions are specific for QuickBooks Online (SKUs) products supporting QBO Payroll.
Disclosures:
Content (including graphic content) is based on Intuit source materials including media source content including website Help resources, and QuickBooks Online Payroll In-Product Help. Intuit content adapted by Insightful Accountant from Intuit sources is furnished for educational purposes only.
As used herein, QuickBooks®, QuickBooks Online, and QuickBooks Online Payroll refer to one or more registered trademarks of Intuit® Inc., a publicly-traded corporation headquartered in Mountain View, California.
Any other trade names or references used herein may refer to registered, trademarked, or copyrighted materials held by their respective owners; they are included in the content for informational and educational purposes only.
This is an editorial feature, not sponsored content. No vendor associated with this article has paid Insightful Accountant or the author any form of remuneration to be included within this feature. The article is provided solely for informational and educational purposes.
Note: Registered Trademark ® and other registration symbols (such as those used for copyrighted materials) have been eliminated from the articles within this publication for brevity due to the frequency or abundance with which they would otherwise appear or be repeated. Every attempt is made to credit such trademarks or copyrights within our respective article footnotes and disclosures.